Wednesday, January 4, 2012

Mama's Strawberry Delight

Strawberries are the angels of the earth, innocent and sweet with green leafy wings reaching heavenward.  ~Terri Guillemets

I'm in complete agreement with the above quote, especially after today's unexpected adventure to Pappy's Patch U-Pick Strawberries. 
After a complete week of being cooped up with the kids due to the unexpected hospitalization of my husband to have his gallbladder removed, we were so happy just to get out of the house and do something new. Thanks to the referral of a good friend we made our way to Oviedo, where it was opening season for Pappy's strawberry picking. This was a new experience for us and I know it's one we will continue to repeat. I'm even looking for other places that we can go to pick our own fruit (suggestions?)! 
The kids had so much fun searching for the right color and size they wanted, and I'm glad that we're shopping for food that I can actually eat and stay healthy (~New Year Resolution~)!

I'm gonna to be a good girl with these strawberries, so while the kids are having shakes and dipping them in chocolate, I am making a scrumptious salad.

Ingredients for 1 serving:
  • 4-5 Strawberries
  • 1/4 cup Walnuts
  • 14 cup Craisins (dried cranberries)
  • Handful of Romaine Lettuce
  • Handful of Spinach
  • Feta Cheese (optional)
  • Lite Raspberry Walnut Vinaigrette Dressing
First, slice the strawberries and crush the walnuts. Place the lettuce and spinach in a bowl and top with the strawberries, walnuts, craisins,  and feta. Mix in the dressing.
Bon Appetit
Filling, Delicious, and (best of all) Guilt Free!

Enjoy! :)

Monday, December 12, 2011

Little Critters 100 "Like" Milestone Giveaway Winner!

It's finally Monday, which means that it's time to announce the winner of the Little Critters 100 "Like" Milestone Giveaway! But, before I do I want to thank everyone for your support and kind comments! I love doing what I do and it only makes it better knowing that other people enjoy it too.

Now for the main event...drum-roll please...
and our winner is SARAH G!

Again, a BIG THANKS to everyone for your support! Make sure you tell your friends about the Little Critters Facebook page so we can reach our next milestone and host a 200 "Like" Giveaway! ;)
Plus, new designs will be coming out for the New Year and sales on the old ones!

Also, don't forget to "Follow" this blog on blogger.com for some fun and creative ideas that you and your family can enjoy!
Happy Monday, Everyone!


Friday, December 9, 2011

*Mama's Kitchen* Cookies For Santa

Pin It

Only 15 days, 16 hours, 20 minutes, and 8 seconds until Christmas. Soon Santa will be making his rounds and working up an appetite ;) What better way to treat him than with these scrumdiddlyumptious cookies.
But before we get started, I want to give credit where credit is due...I love you Pinterest! The original recipes can be found on the Pinterest website, however, to save time and energy I took out a few ingredients and I took a few short cuts (What can I say, I take the easy road!)

Ingredients you will need to complete both sets of cookies:
  • Prepackaged Sugar Cookie Dough
  • Red & Green Food Coloring
  • Peppermint Hershey's Kisses
  • Flour
To get started, divide your cookie dough into 3's over a lightly floured surface.
Knead the first 1/3 with red food coloring (until the desired color is reached)
Then, knead the second 1/3 with green food coloring (until the desired color is reached)
Leaving the final 1/3 white.

For the Candy Cane Cookies take a portion of the red and the white dough and begin to roll them into tubes (like you use to do with your play-dough).
Once your tubes have been thinly rolled, start to twist the red tube with the white tube. Shape it into a candy cane as you go along.
Now place the shaped dough in the freeze for about 10 minutes 
to help the cookies maintain their shape though baking.

Now for the Peppermint Center Cookie:
Simply ball up the desired cookie dough,we used a cookie dough baller :/ (I think that's what its called?)

Next, my son insisted on sticking his thumb in the middle to make a space for the kiss, but I am pretty sure this is not necessary :)


Finally, you can bake the cookies together in a preheated 350 degree oven. Take them out when the edges are lightly browned.


Once the cookies are slightly cooled stick a kiss in the center of our Peppermint Center Cookie and your done!

Santa will love them just as much as the kids enjoy making them!

Don't forget to enter the Little Critters 100 "Like" Milestone Giveaway. The contest ends on Monday, Dec. 12th at noon!


Monday, December 5, 2011

*Crafty Mama* Personalized Ornaments

Pin It

Wow, I can never say it enough, how time flies! We are now only 19 day, 3 hours, 20 minutes, and 8 seconds away from Christmas.
I absolutely love Christmas and I love the family traditions that come along with it. I also love creating new traditions that my children can cherish for the rest of their lives.
This year we are starting 2 new family traditions that I know will last for years!
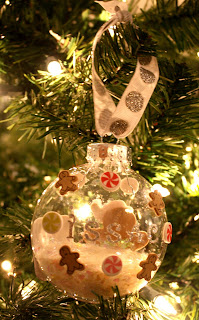
The first is a fun craft that your kids will have fun personalizing...Personalized Christmas Ornaments!


When I went to the store I took my boys with me and I let them choose the theme that they wanted to go with it and it makes it all that much more fun for them.

First you will need the following:
*Clear Bulb Ornaments
*Scrapbook Stickers (letters and fun designs)
*Ribbon
*Confetti
All the supplies can be found at your local craft store


First place your stickers on the bulb as you wish. Each member of my family first placed their names and then their favorite themed stickers.

Next, using a funnel, fill your bulb about 1/3 of the way with confetti.

Finally, tie your ribbon though the top loop and use that to hang your ornament on the tree.


We all had so much fun with these and now we will have them to enjoy every Christmas!

Our second tradition for this year is the famous "Elf on the Shelf"! Our little friends name is Jiminy and he has been warmly welcomed into our house my our little ones. I can't wait to see the adventures to come ;)

Now I must go watch the Polar Express with my boys...Till next time <3 Happy Blogging!

Little Critters 100 "Like" Milestone Giveaway!

Wow! I am so surprised and excited to know that I have hit the 100 "Like" Milestone on my Facebook Little Critters page! I am so appreciative of everyone who has helped me get this far in my home business.
To show my appreciation, when ever I hit a Milestone I have decided to host a giveaway!

To celebrate the 100 "Like" Milestone I have decided to giveaway one of these fun and festive Christmas Elf Hats:

The best part is the winner can choose ANY size from 0-3 months to 3-10 years!

To be entered in the giveaway and eligible for the prize you MUST "like" my Little Critters page through Facebook and comment below that you have done so (or if you already "like" it just comment so below).
 
That's not all!

To add additional entries simply take the following steps below:
1. Add the Little Critters shop to your "Favorites" on Etsy and comment below that you have done so. (1 entry)
2. "Like" my blog page, Professional Mama through Facebook and comment below that you have done so. (1 entry)
3. Become a follower on Blogger to my blog, Professional Mama and comment below that you have done so. (1 entry)

That's a total of up to 4 entries!

The winner will be chosen at random in one week on 12/12/2011.

See Ya Soon!

Monday, November 21, 2011

Multi-use Mini pumpkins

When fall comes around I love to buy mini pumpkins as an accent around the house. Normally I just let them sit in a designated spot and throw them out once Christmas decorating comes.
But, not this year. I am going to share 2 FUNctional and simple ways to dress up these cute little guys for your Thanksgiving dinner.

First lets work on the Pumpkin Place Card Holder.
All you need is the following:
-Mini Pumpkin
-Knife
-Place Card (card stock cut to size)


Simply carefully make a small slice in the stem of the pumpkin with the knife

Put the place card in the slice
Then... your DONE! 
I told you it was simple :)


Next the Pumpkin Tea-light Candle Holder.
You will need the following:
-Mini Pumpkin
-Knife
-Tea-Light Candle

Use your tea-light candle to make a measurement on how wide to 
cut your circle at the top of the pumpkin.
Next, cut out the circle and clean out the pumpkin.

Last, place your candle in the space.

Super easy ideas that look great!


If you have not already, 
make sure you follow--->

God Bless <3

Monday, November 14, 2011

*Mama's Kitchen* Take 5: Turkey...Oh, the possibilities!

Pin It

Ready for the final Take on our Turkey? Okay, so I am running a little behind...what can I say, this is the life of a Professional Mama. Plus, we were too busy eating our new favorite sandwich!

When we last saw each other we were on "Take 4: Turkey...Oh, the possibilities!".
As a quick review we have seen our Turkey in these four meals:


...and now we have our Turkey starring in the infamous Turkey Sandwich! But, this is not your everyday drab Turkey Sandwich it is the Bar B Q Turkey Sandwich...yumm-o-!

Ingredients you will need:
- 1 lb of Turkey (leftovers!)
- 2 tbsp of oil
- 4 bread rolls (your preference)
- 1/2 cup of BBQ sauce
-1/2 chopped onion

First saute your onions in a pan with the oil.
Then add in the turkey and the bbq sauce.

Heat your buns in the oven for a few minutes 
and stuff with your turkey!
Vola...your done!
Super easy and super tasty!
Now you know what to do with all those turkey leftovers you will have after Thanksgiving!


Thank you for joining me in my first series event! It was fun :)
See you soon!